Contents:
General information about woodwind:
The ‘Woodwind’ section; called this merely because at one time the majority of the instruments were made of wood, this is no longer the case. In the orchestra, the woodwind is split into four sections: Flute, Oboe, Clarinet and Bassoon. With the exception of the clarinet the woodwind section plays at concert pitch (C). The clarinet is a transposing instrument, usually in Bb or A, other transpositions are available, including Eb and D.
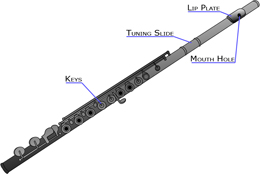
#1: Flute layout (click to enlarge)
Image #1 shows an example of how an instrument may be laid out in the woodwind section. This example is of the flute, although the woodwind instruments may look different to one another, they all share similar design features.
Breathing
As with any wind instrument it is important to remember that the performer uses breath to produce notes from the instrument. When writing parts for these instruments remember to phrase them properly to that the performer has room to take breaths so that it doesn’t disrupt the flow of the music. Big gaps are not essential, a performer will usually breathe in the correct places, just keep in mind that they can’t play continuous streams of notes without taking a breath hear and there. (see also ‘Breathing’ on the brass page)
Circular Breathing
This is a technique that can be used to make it appear that the player doesn’t need to take a breath. As they are playing they lock off the air in their mouths so they can carry on producing sounds, while taking in air through their nose, back up from their lungs into the mouth. Although this is possible to do in all wind instruments to some degree, it is not a common practice. If this is what’s required in the music however, discuss it with the performer. Back to top
Tonguing
This process gives the note its attack; many varieties of tonguing are available from brass players.
Soft Tonguing
The player doesn’t apply so much attack with the tongue, using a ‘da’ or a ‘doo’, making the tone softer and more lyrical.
Double-Tonguing
A technique used for playing a succession of notes in duple time, possibly at some speed. An example of the tonguing action is ‘Tu ka’, which is the way in which the tongue must move to perform this technique.
Triple-Tonguing
Another tonguing technique, this time used for playing a succession of notes in triple time, possibly at some speed. An example of the tonguing action is ‘Tu Tu ka’, similar to double-tonguing technique but produces a triplet effect.

#2: Fluttertongue notation
Flutter-Tonguing
An effect which sounds close to a referees whistle and a similar effect to the unmeasured tremolo effect from the strings. Think of it as an unmeasured tremolo effect, it is produced by rolling the tongue, like a ‘purr’ into the mouth piece. It is quite easy to play this effect on the flute and clarinet but more difficult on oboe and bassoon but still possible. It is notated as the unmeasured tremolo for the strings, with three lines through the stem of the note or above / below it if there is no stem and with ‘fluttertongue’ written above the stave.

#3: Slur Markings
Slurring
No tonguing is used at all. To notate simply draw a slur marking over the notes where a slur is required, e.g. image #2. If the phrase is not slurred, then each not will be tongued, meaning every note with have some articulation to it. Back to top
Trills and Tremolos

#4: Trill & tremolo notation
These are relatively easy on woodwind and can be used to great effect. Most tremolos are possible and will be explained in more detail on the instruments page, a rough guide line for the tremolo is to stay within the range of a perfect fifth as this is the widest range most of the instruments can handle the best. To notate a trill, simply write a ‘tr’ above the note with a curving line afterwards. To notate a tremolo, write with three lines through the stem of the note or above / below it if there is no stem. Back to top
Mutes
The woodwind section doesn’t have any mutes, but if a muted sound is required then it is possible to do. Cloths or handkerchiefs can be placed in the opening at the end of the instrument to produce muffled sounds, the performer could even cover the opening up with there hands or even the side of the knee if sitting down. Be cautious not to write anything that would be impossible for the performer. Think about how it will be performed, what will they be playing and will this effect how the muting works? Also give time for the performer to add and remove objects from the instrument. Experiment with things and don’t be afraid to ask and player for advice. To notate write ‘muted’ over the stave and possibly what and how the instrument is muted. Back to top
